More Love, Peace and Kindness

Follow my blog with Bloglovin


As we finish January I wanted to share my second post for Altered Pages this month for their Love, Peace and Kindness Month. 


I got playing with my Gel Plate which I love to do and was inspired to use Australian Colours.  I love using these prints for a variety of projects such as cards.


I also used some of my prints to create some ATC's on some Eco Art Boards with some positive intentions for the New Year!


To see them though you will have to pop over to the Altered Pages Blog here and while you are there be sure to checkout all the other wonderful projects that were shared this month. 

Peace. Love and Kindness at Altered Pages

This month at Altered Pages it is all about Peace, Love and Kindness in our Art.  My 2017 started with a bang and in a mood to de-clutter and tidy up a little which lead me to finding a box of card samples and one card design I loved. 

So for my First Art Project for Altered Pages this year I am revisiting this design but adding a twist and for a little extra love I have included butterflies on it which I truly think everybody loves, especially when it comes to making art.


For all the instructions and to see just how this design comes together you will have to head over to the Altered Pages Blog to see my post. 

A little bit of Altered Pages Art with the Mailbox Muse!

This month over at Altered Pages the Design Team are showcasing some of the wonderful and fun Mailbox Muse Stamps Sets.  I have been dabbling here and there and this week I was in art tile mode so continued with this idea for my post today.


This included playing with my 5 x 7 Gelli Plate, Paint, Gelatos and a touch of Foil as well as the Under the Sea Fantasy Stamp Set.

To see this up close and for a bit of a step by step you will have to head over to my post on the Altered Pages Blog.  My post there will have links to the products available from the Altered Pages store also.


Earlier in the month I worked with the Hello Dolly Stamp Set to create a cute card!  You can read more about that here.

A little bit of Art to Start the New Year!

Hi Everyone!  Happy New Year, it's been a bit quiet on here of late, 2015 really was a year that heralded lots of change for me personally and so my art has been a bit on the back burner.  Following illness and two surgeries, and moving house, at the end of last year I rejoined the workforce, helping out two afternoons a week, at my local Naturopath and around the same time I also commenced studying Crystal Healing.  

My creative mojo has been on a bit of a holiday but keeps popping in for a short visit........so I thought I'd share a little bit of the art I have managed to create with you today.

My most recent project has been a Valentine's Day Card using some of my Gelli Print Backgrounds. You can view the full process and the finished card over on the Altered Pages Blog.

Love Inspired Gelli Print
 
Thinking ideas through

Earlier this month I played with Paint and Paper just for fun and created a elephant canvas which was inspired by one of my Christmas Presents - Elephant Cushion Covers.

This is still a bit of a work in progress.


I also created a couple of ATC's for a Feather Swap


And at the end of December and Start of January  I participated in the Woman Unleashed Online Retreat.

This was quite a empowering journey, with a lot of meditation, reflection and lots of art journal play.


My fortnightly crafting groups starts back next week at Time to Create so hopefully this will get me a bit more in creative mode and I can share a bit more regularly on the blog in the weeks to come.   Thanks for stopping by.


Christmas Wine Charms

Merry Christmas!  I've been a bit quiet on here, but today over on the Altered Pages Blog I am sharing a simple and quick idea for making wine charms as a cute addition to your Christmas Table.


You will find all the details on what you will need and how to make them over at Altered Pages.

Also today I thought I'd share a few of my favorite Christmas Card Makes from Christmas Past.


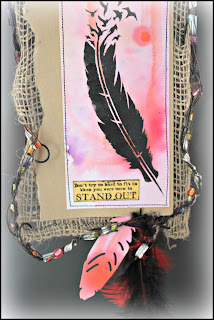
Stand Out - Unruly Wall Hanging

Back in September one of the projects the participants at the Unruly PaperArts Retreat got to make was this wonderful Mixed Media Wall Hanging - a workshop by Unruly Creative Contributor Julie Short of Time to Create. While we were planning and preparing for the retreat this project had actually morphed from a dream catcher, to a wreath before finally becoming this project.  Julie's prototype was done in Turquoise/Teal Tones which you can see over on her blog here.


I had originally planned to do mine in the same colors however at the retreat we had two color choices and it just happened that on the night we played with the Ken Oliver Color Bursts I played with the warmer tones.

At the retreat Julie had her sewing machine on hand to stitch the background pieces of burlap ribbon and cardboard to our Colorburst and Stenciled Background.  I just love the wonderful birds and feather images which are part of a Carabelle Studio Stencil.


Once the stitching was done we took some some bonsai wire, beads and colorful ribbon trim to weave and thread around the piece to add extra interest and create a hanger.  Craft feathers, real feathers and die cut feathers were added to the bottom.

It now proudly is hanging on the side of my fridge where I can regularly be inspired by the quote too.

Angels all Around Us!

Angels are everywhere and currently along with their fairy friends they are taking over my studio.


I have been guided to work with a variety of Articulated Angels, Angel Art Dolls and Fairy Shrine Kits from Retro Cafe Art Gallery.  My order arrived yesterday so I have been playing with lots of color and the mixed media products from DecoArt Media. They include their Fluid Acrylics, Crackle Glaze, Antiquing Cream, and Metallic Lustres.

Witches, Pumpkins and Black Cats Too!

Witches, Pumpkins and Black Cats Too are just some of the images from Altered Pages I have today to share with you.


But today you are in for a treat as I also share my background technique. I know you'll find it kinda neat. Its one of my favorite ways to use up the off cuts and paper scraps that I always collect when creating my other projects.

Using PVA glue stick down paper scraps to a backing paper/cardstock.
Add a few drops of Orange Paint (I have used Deco Art Fluid Acrylics) and brayer over papers.
Using a Fluid Paint allows for the designs of the papers to easily show through.
Take a wet (with water) paint brush and ensure areas where papers meet and overlap are covered with paint.
Then dry with a heat gun.
Using black paint, add further detail with a stencil.  Allow a few seconds before taking your brayer and rubbing over stenciled design.  This gives my background a more distressed look.  Once more dry with a heat gun.

Your background is now ready to cut to size.  As already mentioned above I am using this to make some ATC's.
Once cut to size I used my Rusty Hinge Distress Ink to Ink the edges.

Because Halloween Eve is very near, I decided to use this theme but do not fear, as cute is the type of imagery I am using tonight, nothing too spooky to give you a fright.


Select, cut out and decide on the images you wish to use and their placement.
  The images I have used are all from Altered Pages Collage Sheets.

Stick down and add finishing touches such as other paper strips, words and embellishments
I have added a touch of DecoArt Metallic Lustre to these ATC's.

Thanks for stopping by and Happy Halloween!


I am entering my displayed ATC's into the following challenges.

ATC Around the World - #10 Halloween
Try it On Tuesdays - #Lots of Layers
Tuesday Throwdown - #268 To Cute to Spook
Crafty Boots Challenge - #Autumn and Halloween
Where the HeART is - #2 Anything Goes/Use Stencils